Abstract: AutoCAMS is a term loosely used to describe the automated or autonomous workflow processing of a CAMS station. CAMS has evolved from some simple batch scripts to help automate the daily processing of video files throughout the night to nearly full autonomous operation for months at a time.
The purpose of the NASA/SETI CAMS project is to confirm the known meteor showers and discover new ones. The project has proven to be accomplishing its original goals as well as revealing more information about the complex dust distribution in our solar system.
This purpose of this paper is to provide a history of AutoCAMS from the perspective of its original creator. AutoCAMS was originally a checklist style menu-based set of batch scripts or subroutines, run in a windows command shell console window, that would be performed in the order they needed to be performed (in computing, we call this a “workflow”). While the term AutoCAMS still refers to the workflow, it also refers to the subroutines and programs written to create an almost completely autonomous research project.
1 Introduction
AutoCAMS was originally a checklist style menu-based set of scripts or subroutines run in a windows command shell console window that could be performed in the order they needed to be performed (in computing, we call this a “workflow”). It was originally called CamsMenu.bat in 2011 (Figure 1). The menu included the ability to execute each of the steps that needed to be performed from manually restarting capture to post-capture processing, to sending the results to the NASA server. The menu included the ability to execute each of the steps that needed to be performed. There is a main menu and a Utility menu. Eventually, it was renamed to AutoCAMS in 2011 when it was apparent that it was evolving into automating CAMS processing.
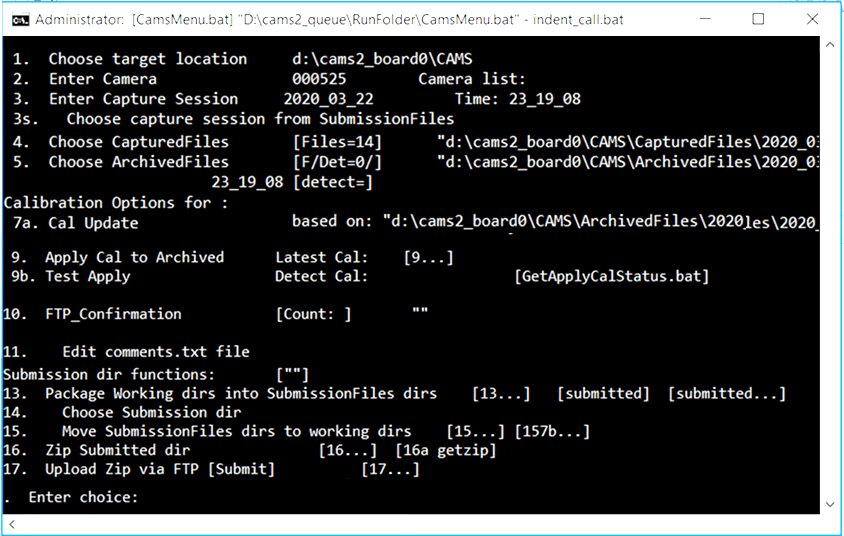
Figure 1 – Original Cams Menu.
Circa 2006–2010, Peter Jenniskens (Figure 2), world-renowned meteor scientist, and member of the Fremont Peak Observatory Association, near Salinas, California, used to bring college students and interns up to the Observatory to teach them how to perform meteor shower observations and recording. He’d bring a group of people with lawn chairs and hot drinks and they’d set up and manually record meteors on their sky maps. He was teaching them an astronomy skill of observing meteor showers. Very often, Peter would also point his DSLR at the sky and record the showers with photographic evidence. At the time, I was a board member at the observatory and Peter and I had some discussions about his work. Sometimes, he would invite me to participate in broader campaigns in order to use the camera images from different locations so that he could triangulate the trajectories of the meteors. I was able to help with triangulation with my own photographic images from my house in Pleasanton, CA.

Figure 2 – Peter Jenniskens, leading scientist of the CAMS project.
It was probably 2007 when one night in the dark, Peter and I were discussing how he’d ideally like to be able to perform multi-site video triangulation using highly-sensitive and expensive WATEC 902 H2 Ultimate security cameras. It was during that discussion that I mentioned to him that it might be possible to configure a computer to have multi-port video cards and record video from multiple cameras per computer to a hard drive. I told him how I had a Windows Media Server computer with a capture card that had two video ports for recording two simultaneous NTSC TV channels at the same time to a hard drive, but that I had also heard about cards with four ports. About a year or so went by when Peter told me about his new research project, which he called CAMS (acronym for Cameras for All-sky Meteor Surveillance). Of course, they needed sites for triangulation and Fremont Peak could be the first. Peter and I were able to convince the FPOA board in 2008–2009 that it would be good for FPOA to have a real NASA/SETI research project associated with the FPOA (Figure 3).
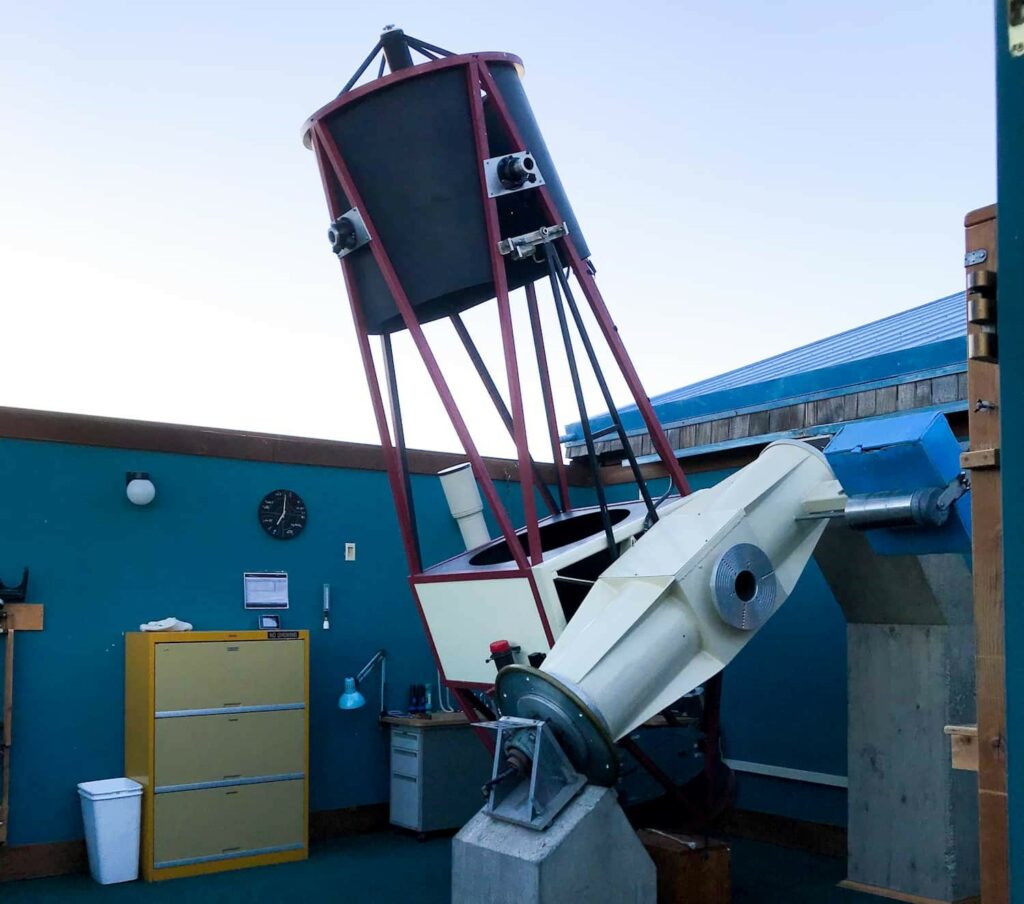
Figure 3 – FPOA “Challenger” 1-meter f/3.58 telescope has been in operation since 1986.
During that time span, in 2008, Pete Gural, under contract from NASA for Peter Jenniskens wrote some C++ programs that perform capture, calibration, meteor detection, and so on, to run on BCSI Linux servers that had 4 port capture cards.
In 2010, we had attached the first 20 camera CAMS box to the East side of the FPOA observatory building and 20 coax cables were very tightly squeezed through a 4-inch conduit to the 5 Linux servers inside the observing room (Figure 4). No internet connection was provided. The servers were configured under contract from BCSI out of Colorado. The software for capture, calibration, and post-capture detection was written by Pete Gural. First light for FPOA was August, 2010 (Figure 5).
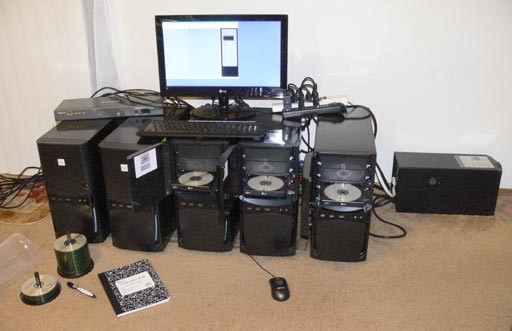
Figure 4 – 5 Linux based BCSI servers and equipment for a single CAMS station.
In 2011, Pete ported those Linux programs to Windows and made them available to Windows computer users in the form of what was called “single-CAMS”. AutoCAMS became a set of scripts that, among other things, called Pete’s programs in the correct order and with command-line parameters that reflected the selected capture session. In essence, AutoCAMS was a wrapper around the programs developed by Pete Gural. In addition, AutoCAMS included several additional utilities and reporting facilities as it related to managing a CAMS site.
Fremont Peak’s overlapping stations were Lick Observatory site and Sunnyvale, CA (Figure 6).
Late autumn 2017, Peter J eventually replaced the 5-BCSI Linux-based servers per site at Fremont Peak, Lick, and Sunnyvale with single windows-based computers. Where there were 5 BCSI servers for 20 cameras before, we now have 1 computer with three 8-camera Sensoray boards with 20 cameras. And we installed the current AutoCAMS system that we designed for the Single-CAMS sites.
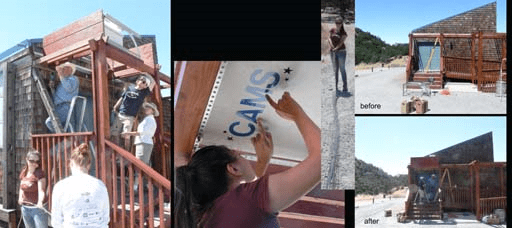
Figure 5 – July 2010, Work party for installing the first CAMS station at Fremont Peak, California.
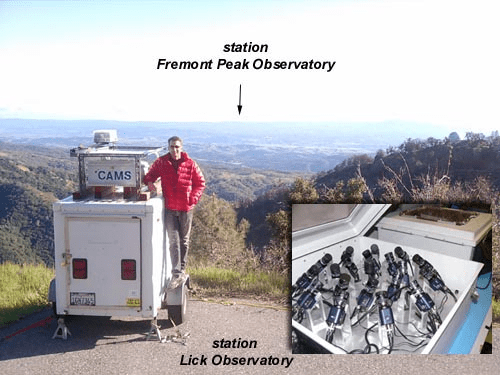
Figure 6 – Lick Observatory CAMS station (seen with Jim Albers) is about 70 miles from Fremont Peak, California.
2 Single-CAMS principles
With all the things that could go wrong with an amateur operated single-CAMS station, it was apparent from the start that these three principles of single-CAMS should be adopted:
- Capture is the first priority. No matter what, capture.
- Don’t send bad data to NASA.
- Avoid causing requests to resend data.
Capturing is indeed the single-most important function. If you capture but don’t do the other stuff right away, you can always do it later. But if you don’t capture, then you’ll never be able to re-create what you’ve missed… the data is lost forever. If you are triangulating with another site, then if you don’t capture, it makes the work that the other site is doing useless. There have been numerous times when it was raining or cloudy in the evening (but captured anyway), to find out that it cleared up not too much later and the station was able to contribute valuable data that night. In some cases, a fireball would be captured through a hole in the clouds. Originally, I had my camera set up on a tripod under my back patio. Eventually, I purchased a set of security camera enclosures so that I’d have more flexibility as to the pointing. Enabling the camera only when you believe that it is good enough clear sky works against this first principle and the data proves that point. Automation is the way to achieve the goals of this principle.
3 Evolution
I believe it was in June 25, 2011, I met Pete Gural (Figure 7) and Peter Jenniskens at the Fremont Peak observatory. They told me that Pete had just released his Windows version of the Single-CAMS software that was used on the Linux based systems. Peter Jenniskens knew that I had a Watec camera already, and that getting started would not be any great expense for me as a kind of test site. Also, Peter knew that I lived within the range of being able to overlap with the CAMS California network.
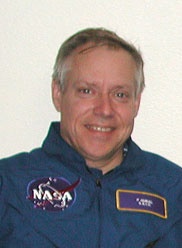
Figure 7 – Pete Gural.
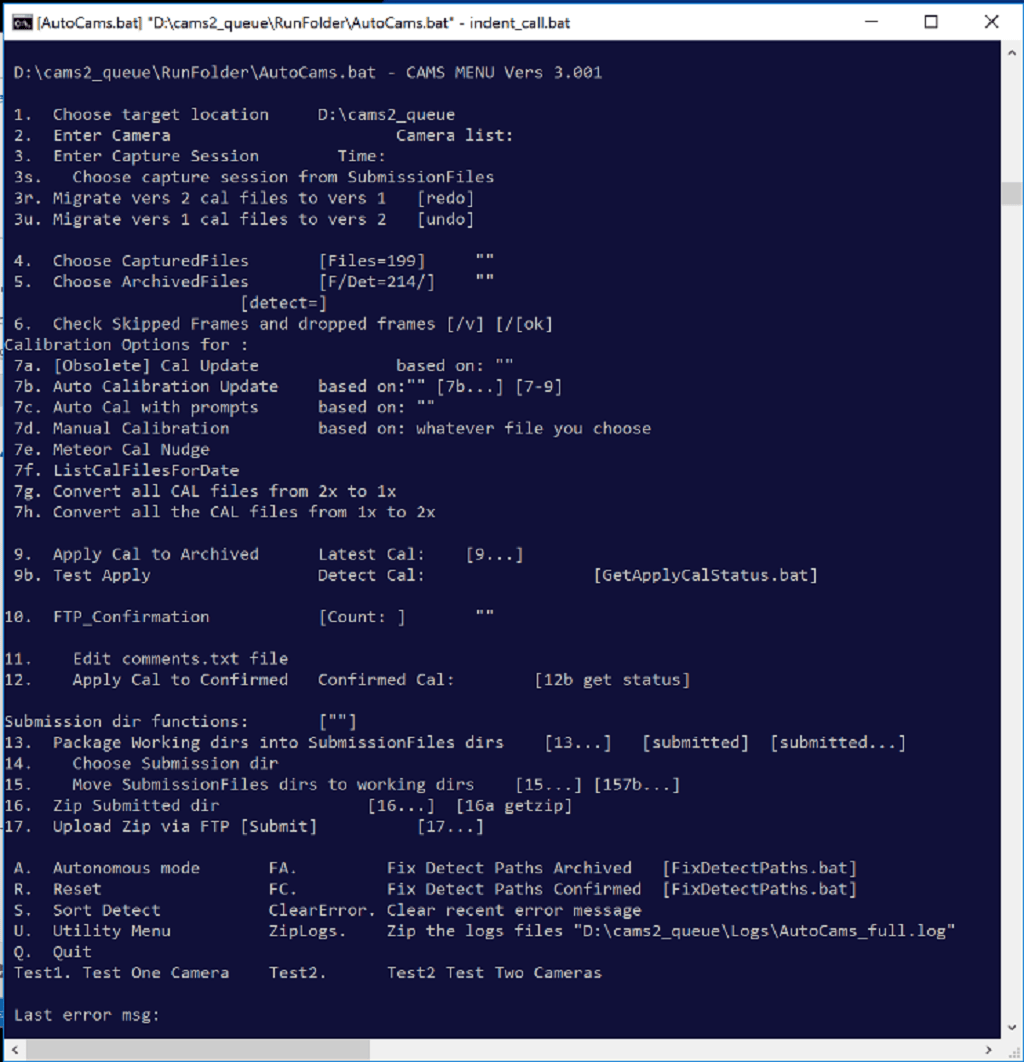
Figure 8 – Screenshot of AutoCAMS.bat checklist menu. Notice how steps 1-17 are in the order they should be performed. Detection is actually #45 on the utility menu, since at that time we were using real-time detection.
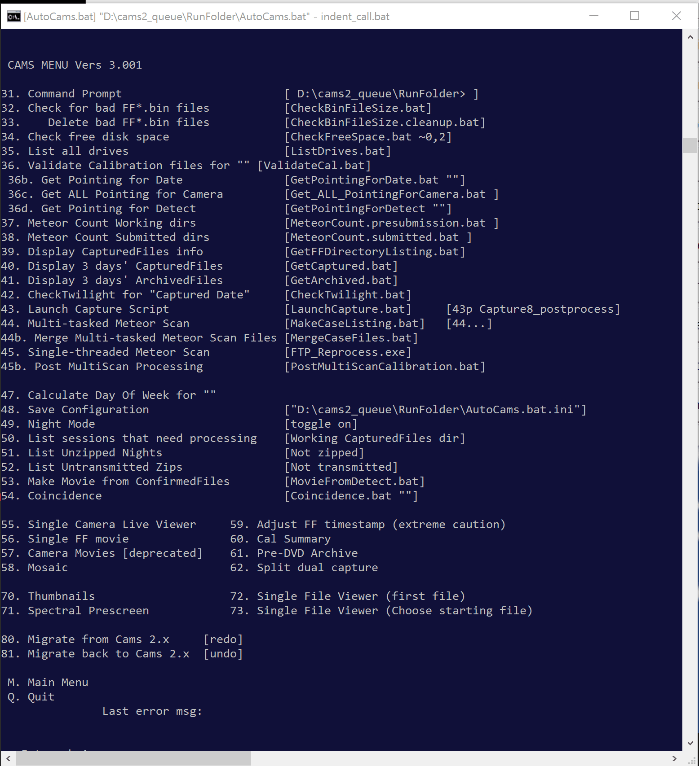
Figure 9 – Screenshot of AutoCAMS utility menu.
Brentwood, CA: August 10, 2011, was first light for the first Single-CAMS. Starting capture manually, and performing all the post-capture processing the next morning was obviously time-consuming and onerous to do manually. The first piece of automating CAMS was done the first or second night – creating a scheduled task in Windows to launch a script that launches the capture program. That way, I wouldn’t miss any part of the night due to forgetting to start capture or just not being home in time to start it. So, for me, CAMS has been automated from the beginning. AutoCAMS evolved from that point.
Pete modified his programs so that it would take command line arguments from scripts in order to parameterize the startup. I also helped Pete design some multi-threaded programming so that he could do capture and meteor scanning at the same time, which Pete has implemented brilliantly in his capture programs and other programs he has developed since then. (However, in the evolution of AutoCAMS, we later disabled the real-time meteor detection (with INI file settings) because it is not resilient to power outages and other interruptions and we had to figure out a way, outside of capture, to handle power interruptions). Also, Pete Gural improved the speed of detection by about 70×, which made it feasible to do post-capture detection in a reasonable amount of time.
AutoCAMS was originally called “CAMS Menu”. That’s because it was a menu that executed necessary CAMS functions by entering the checklist item number. A few months later, it was renamed to AutoCAMS (Figures 8 and 9). AutoCAMS started as a simple set of Windows batch scripts and Windows scheduled tasks. When batch language was too slow, a batch script would create a VBScript, which was called and executed. There are only about 8 of those VB scripts. I wanted AutoCAMS to be “open-source”. The reason that batch script language was chosen was so that anyone, in any time zone or location in the world, at any time of the day or night, could modify them if there was a problem. I could have written AutoCAMS in C, C++, Java, or VB, since I have decades of experience in those languages, but I chose Windows Batch language because nothing would need to be installed on people’s computers and there shouldn’t be versioning or DLL or runtime library version issues. With the other languages, not everyone would be able to program, compile, and link without having to deal with licensing issues, training, and such. From 2011 – 2017, the scripts evolved into over 100+ batch scripts that would call each other to get the job done. By 2021, there are over 300 script files with over 90000 lines of code. Over time, some of the scripts have become obsolete and no longer used. Some effort should eventually be put into removing all that are no longer useful. One of the first scripts was LaunchCapture.bat, which was called by a scheduled task.
Then Jim Wray (Figure 10) joined the CAMS project and first light for his site was December 13, 2011, starting with a single old Watec camera, just in time to capture the annual Geminids meteor shower, and he has been providing data since then. Jim is the author of the 1967 book “The computation of orbits of doubly photographed meteors”, which he wrote when he was director of the Institute of Meteoritics at the University of New Mexico in Albuquerque. Jim’s site was over 100 miles from my house (until I recently moved to Texas), and it triangulated well with Brentwood, Lick Observatory, and eventually Sunnyvale. With Jim’s station being the first remote station, AutoCAMS had to evolve to be more user-friendly and reliable.

Figure 10 – Jim Wray.
2012 saw CAMS sites installed in the BeNeLux sites (that’s Belgium, Netherlands, and Luxembourg) started with 4 cameras. By February 8, 2014, there were 30 BeNeLux cameras operational.
October 28, 2013, AutoCAMS was configured and tested in Sunnyvale for the professional New Zealand arrays before shipping them out. This was the first time that the single-CAMS software and AutoCAMS was used on one of the professional CAMS stations. The boxes arrived in New Zealand December 12, 2013, one damaged during transport. These stations were the last to use the expensive 16-port $1500 Sensoray board. The 8-port boards are only about $220 each.
In 2014, Jim Wray came up with the idea that we should be able to prove that cheap 1/3-inch cameras could now be sensitive enough to be used for CAMS data collection. So, Jim purchased 2 eight-port Sensoray boards (about $220 each) and 18 of those cameras (average about $45 each), various models and brands, and I purchased a 4 port Sensoray grabber and a few different models of Chinese based 1/3” cameras and he and I tested the efficacy of using those cameras with CAMS so that people would be able to set up sites with more cameras for less money than using the Watecs. The Watec cameras cost about $400–$500 plus the $120 lens, depending on where you buy them from, availability, tariffs, etc. A typical 16-camera site would commonly top $10000 using the Watec cameras. Some of these 1/3” based cameras purchased from Ali-Express were as low as $25 each. Pete Gural modified his FTP_CaptureAndDetect program and produced FTP_Capture8AndDetect.exe and FTP_Capture4AndDetect.exe so that we could run our tests. Jim ran two Sensoray boards at the same time for several months and we got good results. A paper was published at the 2014 conference in Giron, France (Samuels et al., 2015), that shows how we can attain almost equal sensitivity to the Watec cameras (+5.9 meteor limiting magnitude) when the Watecs are using f/1.2 lenses and the 1/3” cameras are using f/0.8 lenses. Jim had f/0.75, and f/0.9 lenses. I had originally used f/1.2 lenses and I eventually switched to f/1.0 lenses. However, f/0.8 lenses are not readily available in the 1/3” format, so we typically settle for f/1.0 lenses. Jim and I also calculated the spatial resolution for an average Watec camera with a 12mm lens pointing at roughly 45 degrees elevation. We came up with about 100–110 meters per pixel at the 90 km layer at that distance. Therefore, we aimed to achieve that same spatial resolution with the 1/3” cameras. Doing the math, we decided to use 12mm lenses when pointing at 26 degrees, 8mm lenses when pointing 45 degrees, and 6mm lenses when pointing above 74 degrees (Figure 11).
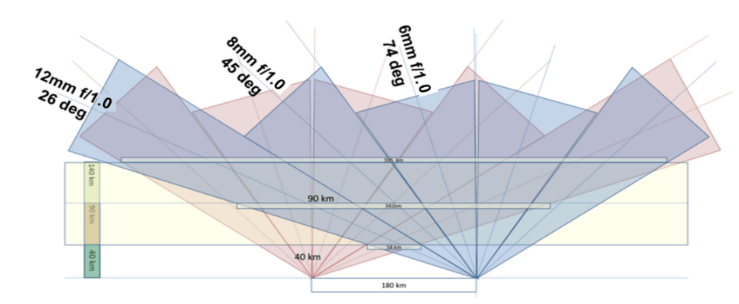
Figure 11 – This shows how to tune the focal length to match the elevation angle. In this figure, we show how two 16 camera stations, when designed for each other, can achieve full-sky coverage.
That strategy achieves full-sky coverage from 13 degrees elevation to 90 degrees.
Jim’s 16-camera station was the first array with 2 Sensoray boards with 16 cheap 1/3-inch cameras in 2014. His site contributes almost as many meteors as any other around the world. Which proves its sensitivity.
San Mateo College became the third single-CAMS station December 23, 2011.
Figure 12 – Steve Rau.
Steve Rau (Figure 12), in BeNeLux, had been trying to use the AutoCAMS scripts for his stations and a few others. He believed that automation was the key to getting consistent and reliable results.
4 CAMS 2
During 2015–2017, there was a long-protracted period when I was away and it was nearly impossible for me to support remote CAMS stations. I either had very poor and intermittent access through a mobile hot-spot or I was at work behind a corporate firewall, which blocked my ability to support CAMS sites. Steve Rau stepped in and helped out quite a bit and he saved the day, taking over for me in keeping everything up and running. It was during this period (circa 2016–2017) when Pete Gural released CAMS 2. CAMS 2 expanded the camera number format from 3-digit to 6-digit camera numbers and he changed the file format and a few other things that made the AutoCAMS scripts incompatible. After Steve got tired of waiting for me to return and fix AutoCAMS to adjust to CAMS 2 format changes, he reverse-engineered the AutoCAMS scripts using Delphi – Pascal. You could say that the “open-source” nature of AutoCAMS was successful due to his ability to do that.
5 AutoCAMS 2
Steve’s goal was to use Delphi/Pascal and create parity with the AutoCAMS checklist style menu system while making his system compatible with Pete’s new CAMS 2 format. As he worked on things, his understanding of how I had coded the algorithms increased and he started coming up with good ideas on how to improve the workflow. Eventually, Steve had LaunchCapture.exe and CamsGUI.exe working, which appears to be what he still calls “AutoCAMS” in his documentation. I wished there was a way to keep Steve’s code open-source too, but that is entirely up to Steve.
I eventually returned home from my trip and I started working closer with Steve to get everything working smoothly. One of the issues we had was that the BeNeLux workflow was different than the rest of the world’s CAMS workflow. This is in part because, in BeNeLux, they were required to do manual meteor confirmation. This made it impossible to fully automate and run autonomously. So, there were differences between his system and mine.

Figure 13 – Screenshot of CamsGUI.exe. Notice how the buttons are in approximately the same order… to create parity with AutoCAMS.bat. Reprocess is the same as Meteor Scan or Meteor Detect.
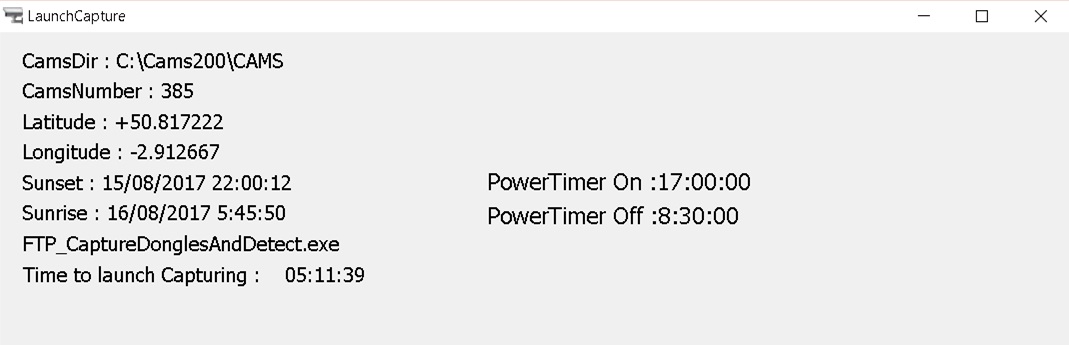
Figure 14 – Steve’s LaunchCapture.exe for board 0 waiting to start the capture program.
We collaborated and we made the necessary changes to allow us (non-BeNeLux) to be able to use Steve’s LaunchCapture system. So BeNeLux uses the LaunchCapture.exe and CamsGUI.exe to perform all of their duties, where there are some manual steps required to perform using CamsGUI each day. They don’t use any of my AutoCAMS scripts anymore. The rest of the world (except DC and Sunnyvale) use a hybrid of LaunchCapture along with my AutoCAMS scripts, without much use of CamsGUI, for full autonomous operation. So, what should we call them? I think they can both be called AutoCAMS, since to me, AutoCAMS means to automate CAMS operations. How do we differentiate one from the other? I’m not quite sure and it probably doesn’t matter.
Ideally, all configuration changes are governed through .ini files. Steve and I worked together to decide on which variables to use for these configuration variables and how they’d be used. Steve’s LaunchCapture.exe and CamsGUI.exe programs are governed using a CamsGUI.ini file. There is also a backup of CamsGUI.ini that is used in case you lose network connection while modifying it. There is one of these INI files for each CAMS instance. My AutoCAMS scripts now mostly use the “…\cams2_queue\RunFolder\Cams2Global.ini” file, although they do read the CamsGUI.ini file variables and adapt accordingly. The non-BeNeLux systems do not use CamsGUI.exe very often much. But it is still there and configured.
Steve and I worked out a way for his program to deal with multiple Sensoray capture cards, as each board would have its own “instance” of LaunchCapture.exe and CamsGUI.ini. Since none of the BeNeLux stations had multiple Sensoray boards at the time, it was difficult for Steve to visualize the issues and test his code. So, you have to appreciate what Steve accomplished. Steve’s solution was for his LaunchCapture program to keep track of how many boards there are running and, during post-capture processing, one LaunchCapture instance sleeps until the next higher one ends before it starts doing its own post-capture processing.
My thoughts about how the workflow should work also evolved over time as to how to make the system more resilient to power outages and unexpected restarts.
6 LaunchCapture
Like the original LaunchCapture.bat script, LaunchCapture.exe is a program that is somewhat sophisticated. Unlike the original LaunchCapture.bat script, which was a script called by a scheduled task, the LaunchCapture.exe program is called directly from a scheduled task. There will be one scheduled task for each CAMS instance. A CAMS instance is a copy of the entire CAMS working directory tree, complete with a copy of the main capture programs, DLL libraries, star database, CAL files, runtime libraries, and a few other things. There is no need in a CAMS instance to use my scripts or a RunFolder, my .BAT scripts, or configuration files to be copied to the CAMS instance directory. Those files are in a separate common directory structure used across all CAMS instances.
Steve’s LaunchCapture.exe program does a lot. Let’s just outline its workflow:
1) It launches at the same time each afternoon (around 5 pm), reads the configuration files, and it checks the time and the sun-angle defined in the CamsGUI.ini file. The SunAngle variable defines the angle of the Sun when we want to start capture. Effectively, we want to wait until it is dark enough to capture before launching the FTP_Capture8andDetect.exe programs. Pete Gural’s FTP_Capture… programs do the same thing; except they interfere with the user’s keyboard, once a minute, during the time between when it started and the time capture actually begins. LaunchCapture.exe’s method of waiting for the Sun angle is a workaround for an issue with Pete’s waiting algorithm. An example is like this: Let’s say it’s June 20 – shortest night of the year. If we run LaunchCapture at 5pm each day (a time before it is astronomically dark all year), then the time to start capturing video would be, let’s say, 9 pm. So, for 4 hours, the program needs to wait before cameras start capturing. Meanwhile, you are free to use the computer during this time.
2) When it is finally time to start capturing, LaunchCapture awakens, and calls the FTP_Capture… program specified in the .ini file, with the correct command line arguments. Then it does a well-behaved wait until the child capture process ends (that will likely be just before sunrise the next morning, as determined by Pete’s capture program using the Sun angle passed to it from LaunchCapture). While it is waiting, LaunchCapture instance is not consuming any CPU resources. It is not polling, it is waiting.
3) Whenever capture ends, LaunchCapture awakens and performs post-capture processing from the highest board number to the lowest. It starts with the most recent capture session in the CapturedFiles directory, then it works backward and performs post-capture processing for any backlog of unprocessed capture sessions until the CapturedFiles directory is empty.
4) LaunchCapture’s post-capture processing is done in phases for each capture session for that board:
- Validation
- AutoCal
- Detection
- Apply calibration to detect file
- Manual Confirmation (only for BeNeLux users)
- Migrate to SubmissionFiles
- Create the Transmission zips (only for BeNeLux users)
- Upload the Transmission zips (only for BeNeLux users)
- Archive (only for BeNeLux users)
Once it is done with the Apply step, it “moves” all the files to a directory that uniquely identifies the board number and the capture session under SubmissionFiles. Each SubmissionFiles directory will have subdirectories for ArchivedFiles, CapturedFiles, optionally ConfirmedFiles, FTP, and Logs. If you are a BeNeLux user, you are required to use the CamsGUI program to launch the Confirmation program, do the confirmation step, and then manually upload the files to the server (by selecting the appropriate button in CamsGUI). If you are not a BeNeLux user, then confirmation is not performed and all the steps are handled autonomously.
Then it repeats these steps for each capture session if there is a backlog of capture sessions remaining in the CapturedFiles directory.
When it is able to complete all its work, then the CapturedFiles directory for that CAMS instance should be empty.
5) Once LaunchCapture has completed post-capture processing for all the capture sessions in the instance’s CapturedFiles directory, it ends.
6) Once LaunchCapture ends, if there are multiple CAMS instances, the remaining LaunchCapture instances will have been polling the system processes every 5 minutes to see how many LaunchCapture.exe instances there still are.
7) If there are multiple CAMS instances, there will be 2–3 instances of the LaunchCapture.exe process to start with. When each LaunchCapture.exe process started, it kept a count of how many other LaunchCapture processes there were at the time and it assigned itself a number based on that count. The post-capture processing happens from the highest CAMS instance to the lowest (as determined by board number starting with 0). When a higher board number’s LaunchCapture instance is performing post-capture processing the lower board number’s LaunchCapture instances poll once every 5 minutes to see if the instance count has dropped and if it is that LaunchCapture instance’s turn to run.
8) If the instance count drops to its assigned count number, then that LaunchCapture instance awakens and performs its own post-capture processing, using the same steps as above.
Non BeNeLux sites have been using a hybrid of Steve’s LaunchCapture.exe with the addition of my AutoCAMS scripts, which are now all situated in the “…\cams2_queue\RunFolder”. Unlike with LaunchCapture.exe and CamsGUI.exe, the queue system is one system for the entire computer, no matter how many CAMS instances there are. Each CAMS instance location is specified in the Cams2Global.ini file, which contains the variables used by the queue-based scripts to locate all the CAMS instances.
7 Storage management/archiving
A huge issue to deal with is the massive amount of data produced by a CAMS station. Each camera can produce about 6.5 GB of data files during capture each winter night. Less on summer nights. While most of the BeNeLux sites didn’t have 16–20 camera sites with dual or triple Sensoray boards, most of my sites did. By “my sites”, I am only using that term as a way of referring to the stations that I’ve been managing. With a 20-camera site producing over 120 GB per night, and with some of their cameras being noisy because of faulty wiring, even a 6 TB hard drive couldn’t hold enough archived data. With a background in working for EMC, which was a leader in the n-tier storage world, I realized that AutoCAMS needed similar storage management – some 2-tier or 3-tier storage management.
You see, I kept getting pulled into fixing people’s disk-full issues. So, I redesigned the Archiving scripts and protocols to keep the data management under control using an n-tier strategy. Originally, we would wait until MaxDaysToKeep INI file parameter to trigger culling of the CapturedFiles directory. Culling the CapturedFiles directory at that time was possible because a copy of any FF file that had an event (meteor) was stored in the ArchivedFiles directory. Then we would ZIP the remaining files of the capture session into a zip file and move it to the archive drive/directory. That way, if it was ever needed, we could unzip a capture session and do research on it as needed. Ideally, the archive drive is a removable hard drive that, when full, can be swapped out for a new one. The Arizona stations were the first to implement my external archive drive design, and that has proven to be effective… and recommended. Eventually, I learned that the archive scripts should instead create the zip file as soon as it was possible instead of waiting MaxDaysToKeep. It was only the culling that needed to wait. Then I leave a flag file, marking the capture session as “AlreadyArchived.txt”, so that it does not need to be zipped and archived again – only the session’s CapturedFiles dir need to be culled. This makes the archiving more resilient to power outages, aborts, and other interruptions and it protects against not getting a chance to run when there is a backlog (Figure 15).
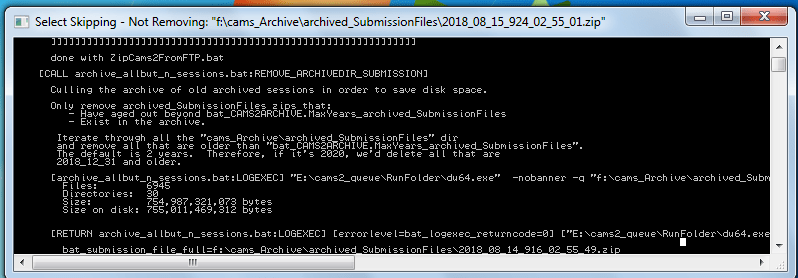
Figure – 15 Screenshot of the Archive program just getting started. This Mars Hill station has drive E: as the CAMS drive and F: as the Archive drive.
To re-archive a session, simply delete the AlreadyArchived.txt file from that capture session’s CapturedFiles directory. If needed, you can always unzip the archive zip file to its location in the SubmissionFiles directory.
Using this storage management scheme, we have some 16 camera stations with 1 TB hard drives that have run for months or nearly a year, without having to intervene. Note: 16 camera stations are difficult if they only have 1 TB of storage, so we recommend obtaining more storage for the CAMS drive in those situations. Sadly, we can’t archive all the data like this forever. We have also found that we cannot depend on humans to periodically cull their archives or to move them off-site. So, I also had to implement the ability to automate the culling of very old archive zip files when the hard drive starts to fill up with archive files. We have automated this too. We delete everything that is a too old (about 2 years), from the archive’s Transmitted, CAL, and SubmissionFiles. We use the INI file setting [CAMS2ARCHIVE].MaxYears_archived_SubmissionFiles, and MaxYears_archived_TransmittedFiles. The CAL files are always archived when they are older than MaxDays_Cal days.
8 Uploading
The upload routines are another set of routines that have evolved over the years. When we upload to the NASA server, we have always collected just a very small part of the capture session, compressed it into a zip file, and uploaded it to the NASA server to a directory specific to the station’s CAMS network. This is why a reliable internet connection is required. That file is called the “transmission zip file”. The file consists of the detect file, CAL files that were used in this session, local-midnight FF files, and a few other files that indicate how it was configured during that session. An 8-camera zip file is typically about 2 MB – 5 MB. With a noisy camera, these can be 50 MB – 80 MB.
Originally, we had used the Microsoft FTP program to upload the transmission zip files to the NASA server. However, we learned that we needed a tool that is more resilient. FTP had many issues and was not reliable at all. We switched to WinSCP for that. It performs retries and it returns error codes. But, WinSCP can still fail. We have encountered numerous situations where the FTP upload failed for all manner of reasons. The reasons range from local network being unavailable, to power outage in the middle, to NASA server being down for a few days. I wanted to design a system that could handle this automatically. So, I developed the “queued” upload (Figure 16). Regardless of the ability to upload successfully, all transmissions that are ready are placed in the queue directory. Along with the zip file is an MD5 hash file for that zip file. (A hash file is a small text file with a number that uniquely represents the contents of a file. It uses cryptographic algorithms to come up with the hash number). The upload script creates a text file that lists all the transmission zip files in the queue. Then it sorts them and then uploads them from oldest to newest. Once a transmission zip file is uploaded, it is immediately downloaded to a local temp directory for validity testing. For validity testing, we rehash the downloaded zip file with MD5 and compare the two before/after hash files. If they are different, then we know the file got corrupted and we move on to the next transmission zip file, leaving the original transmission zip still in the queue, since we don’t really know the reason the upload failed. The failed zip file will be handled on the next go-round. If the MD5 matches, then the temporary zip file is unzipped. If the unzipping function fails, then we know that the zip file is corrupt in some other way. Otherwise, the upload succeeded. If the upload succeeded, then we upload the transmission zip files .md5 file to the NASA server and then move the transmission zip file and its .md5 file into the Transmitted directory. The people at NASA/SETI could write scripts such that if a zip file is present but its matching .md5 file is not present, then they’d know either the zip file on the server is corrupt or it is not finished uploading – in other words, they shouldn’t use it. They should be able to use the .md5 files to do their own hash-check before incorporating the data into the day’s Coincidence processing. Before a zip is added to the queue, the Transmitted directory is checked to ensure that it is not already there… to avoid uploading it a second time. If you really want to upload it a second time, then you must delete its md5 file and zip file from the Transmitted directory first.
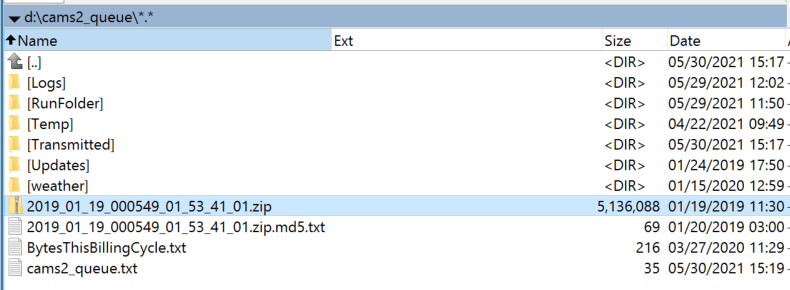
Figure 16 – cams2_queue directory with one transmission zip (not yet transmitted) and its corresponding .md5 file. Also shown is the cams2_queue.txt file with the name of the zip file. Once upload is verified, the zip and its .md5 file will be moved to the Transmitted directory. All the scripts are placed in the RunFolder.
This protocol is not too dissimilar to the Amazon AWS S3 upload protocol (a fact not discovered until years after I developed it). However, since Amazon’s server is based on web services, Amazon avoids the download step and just compares the hashes. We can’t do that because our server is just a dumb FTP server. Because of that, Amazon AWS S3 upload protocol is much faster. So, I had to come up with a different workaround with all the logic on the client-side. Once the queue is processed, we wait about an hour and then check the queue for any remaining zip files in the queue directory. The queue might not be empty due to failure to upload one or more zip files the first time or, while we were processing the queue, other scripts had completed post-capture processing and new transmission zip files would be available in the queue. If the queue is empty, then uploading is done for that day. If there are still zip files in the queue, then we keep trying every hour until 3 pm, when we need to start getting ready for the next night’s capture.
Two other features that were designed with our uploading protocol, one is that the zip files that we upload can be sequenced with a sequence number suffix. We might need this if we had to upload to a server that was read-only. The other feature is the ability to send split zip files. A split zip file is a zip file that is sent in small chunks and reassembled by someone at the receiving end. This prevents the need to re-transmit very large files in the case of an upload failure. At some sites, it is more likely to be able to consistently transmit ten 2 MB files than one 20 MB file. And if the 20 MB file had an issue during the transmission, only the failed split files would need to be retransmitted. Both these features of the protocol are built-in to the uploading scripts; however, we almost always disable them in the INI file. Especially since, at the server end, they have not written the code to be able to handle sequenced file names or to reassemble the split zips.
This protocol has proven to be reliable and resilient. Anyone else, such as RMS, could adopt a similar protocol to ensure reliable uploads.
What’s cool about this approach is that if there is a problem, then it kind of fixes itself. We recently had an issue at Fremont Peak, where there was about 1.5 months of data that had not been processed. I don’t remember the exact reason why. But once the problem was resolved, the AutoCAMS routines simply started working as they should. It took 7 days for the system to automatically catch up by itself. One of the issues we were having at the time was that the cameras had gotten so noisy, that each capture session was expanding to about 200+ GB and taking too long to do post-capture processing. We fixed the problem with ground-loop baluns, because the wiring was already in place. However, moving forward, using Cat6 with Video Baluns at each end instead of coax with ground loop baluns is recommended.
9 Unique naming convention
A lot of thought was put into the naming convention for the archives and the transmission files that we upload to NASA. This is something that has also changed and evolved from 2011 – about 2014. The naming convention is important because (A) it must allow us to upload multiple sessions in a night in case there were power glitches or other restarts, either expected or unexpected; (B) it had to allow these multiple uploads without them overwriting previous uploads; (C) it allows the Coincidence process to include all of the capture sessions, no matter how short, for its triangulation procedure; (D) a similar naming convention was created for the archive files.
For capture sessions, transmission zips, and archive zips, the convention is to use the capture session start time with a unique camera number:
“yyyy_mm_dd_<camera>_hh_mm_ss.zip”.
We separate the start date from the start time with the camera number in order to facilitate sorting and grouping. For “camera”, we use just the first 6-digit camera number for the CAMS instance. The files do not need to have the entire camera list as we once tried. Neither do they need the first and last camera numbers. All we are trying to accomplish, and this is important, is to come up with a unique name that does not conflict with a file name from our own or from another site. So, for other capture session-related files, such as a detect file, a unique naming convention uses something like this:
“[prefix]_yyyy_mm_dd_[camera]_hh_mm_ss_[suffix]”
where <prefix> is the name of the file, such as “FTPdetectinfo”. <suffix> would be any other information that needs to be conveyed and/or the type/extension of the file. It’s important to add a “.ccc” extension on the file so it can be sorted, grouped, and/or associated with an appropriate application. The CAMS date/time format uses only underscore “_” as separators instead of “:” or “.” or “,”, etc. That way, no localization of parts of dates and time values is required. “yyyy_mm_dd” would be the capture session UTC date of the start of the capture session and “hh_mm_ss” would be the capture session UTC time of the start of the capture session. Capture session directories in CapturedFiles are already named like this: “yyyy_mm_dd_hh_mm_ss”, where that indicates the UTC time of the start of the session. So, you can determine the capture session start time by parsing the directory name.
For non-capture session related files, a unique naming convention would be something like this:
“[prefix]_yyyy_mm_dd_[station]_hh_mm_ss_[suffix]”
or “[prefix]_[station]_[suffix]” for files that don’t require date/time. Where “yyyy_mm_dd” and “hh_mm_ss” would be the date/time, in CAMS format, when the file was created and [station] would be some code that uniquely identifies the station. For example, you could use the first camera of the first CAMS instance or something like the “CODE” column in the CameraSites.txt file, or the lat/long of the site, or anything else, just as long as it uniquely identifies the site worldwide. Another option, if the time is not important, is to use this convention:
“[prefix]_[station id]_[suffix]”
For example:
“Status_000957_MC_Meteor Crater.txt”
It’s important to use a naming convention that performs its own grouping when sorted. For example, sorting by station name would not group all the Arizona stations together. However, including their first camera accomplishes that.
10 Rebooting
We have also repeatedly learned, through troubleshooting, that we needed to reboot the computers just before archiving and also before LaunchCapture each day so that (a) post-capture processing of backlogs will not interfere with current archiving procedures or capture. I have only implemented that at a few test sites so far. Rebooting before archiving solves a few problems that have been experienced. When backlog processing is active, it can slow the archiving procedure to the point where it could take more than we’ve given it (usually about an hour) to complete. (b) Remember, the computer reboots again each day at 4pm to clear the system of rogue applications in order to avoid dropping frames from the video grabber during capture. Rebooting the system also clears any issues with computer locking up due to electrical glitches and such. You can always remotely regain control after 4pm.
11 Status reporting
In 2018, I introduced the GetStatus.bat script. The GetStatus script reports on the status of the station. Calling GetStatus.bat is incorporated within the Upload_Queue.bat script. Each station runs the status report several times per day. After it is run, its report is uploaded to the NASA server to a shared location where all status reports are kept worldwide. Each status report has a unique name according to the station name, not according to the session name. Therefore, status reports on the server will overwrite the previous status report.
A status report contains a lot of information. It will contain information about your system, such as windows version number, disk space, when the report was created, how much network data you have used in this billing cycle, and when it was most recently rebooted. An issue detected here will be cause to take action, for example, to free up some disk space.
It also contains a list of the 10 most recent Transmission files and their MD5 files. This gives you an opportunity to determine if your upload procedures have been successful. If they are not, then you’ll need to take action to determine why and resolve it.
It reports on how many unprocessed Capture sessions there still are in the CapturedFiles directory. If there are any that appear, then you will be approaching a disk space issue. This is an indication that some action needs to be taken to correct the problem.
A big part of the report is the SubmissionFiles section. In this section, each of the most recent 10 capture sessions are listed for each CAMS instance. For each capture session, you will see the entire size of the capture session in MB, how many files there are (you can compare these numbers with other sessions), the session name, the total number of detections, and whether the Validation, AutoCal, Detection, and Transmitted phases of post-capture processing have completed or failed.
In addition to that information, each camera’s information is listed to help you identify trouble spots. For each camera, we show the capture session, the camera number, the number of detections for that camera, the FOV and image scale, the CAL file, and dropped frames information. Too many detections points you to a noisy camera. Too many dropped frames points you to a CPU contention problem in the computer. If the image scale is different than previous capture sessions, then you might have a scale flip/flop problem.
A list of the 20 most recent CAL files is then shown in the CAL files section. A camera that consistently fails to calibrate indicates that some manual calibration intervention is needed.
The archive settings are displayed, indicating how long you intend on keeping session data around outside the archive. If you are running out of disk space, you can examine these figures and look at whether to modify the MaxDaysToKeep setting. MaxDaysToKeep applies to the number of days to keep CapturedFiles FF_*.bin files before culling them.
There is also a list of the 10 most recent archive zip files, along with their sizes. Excessive sizes will inform you of issues related to archiving sessions with noisy cameras and it is possible that it takes so long to process, that you never get a chance to complete the ever-important disk management part of daily processing. Also, a list of each of the cams_Archive subdirectories and their sizes in case the information is helpful.
There is a list at the bottom that indicates which processes were still running at the time the report was generated.
The final step is to upload the report to the status folder in the server. This provides a central place to access station status without having to connect to each station. It is helpful to network coordinators so they don’t have to remotely connect to stations to determine if they are OK. Also, you should be able to configure your phone or tablet to access this information when you are away from your computer. Lastly, they are used by the Status_Check.bat scripts.
12 Status_check report
Sometimes, the GetStatus reports contain too much information for you to quickly see issues that you might be having. So, some Status_Check reporting scripts were created to only report on the alerts that you need to consider taking action on. The Status_Check.bat scripts download and read the GetStatus report(s) from the collection of status reports on the server. If nothing is wrong, they will simply list that the status report was found and read OK.
However, the Status_Check scripts were created to “read” the GetStatus reports of the stations in your network and to alert you of issues, such as disk space getting too low, noisy cameras, and cameras with excessive dropped frames. Excessive dropped frames and excessive detections per camera have three alert levels: warning, watch, and critical.
In addition, it will report if the station has not uploaded a status report after 2 or more days, indicating that someone needs to attend to the station to make sure that it is up and running. There are a few other things that are reported in the status_check reports, but I don’t remember right now. One of them is whether the power is off to individual cameras. This is a common condition when people are trying to use Christmas tree timers in timer mode instead of day/night mode to power the cameras and the timer is not set to the correct time.
The status report is generated as a text file, then it is converted to an HTML file with hyperlinks to the full GetStatus report that was downloaded from the server. This is a very useful tool.
The Status_Check reports are not uploaded to the server. They are kept locally. They can be run from any Windows computer that has the AutoCAMS scripts configured. They are also only run when you tell them to.
The Status_Check reports are designed to also be able to work with a Status_Check_<network>.txt file. When the status_check script is told to use the file, it produces its report for all stations in the local CAMS network. For example, status_report_AR.txt to produce a status report for all stations in the Arkansas network.
You can create a shortcut on your desktop to launch the script with your network file.
13 CAMS pointing tools
While it’s not specifically part of AutoCAMS, around September, 2014, I developed the CAMS Pointing Tool. It can be used to create a Laydown before setting up your AutoCAMS.
The tool takes time to get used to, but it is a useful tool for site operators to help in determining where to point their cameras to attain the best overlap with other cameras. It can be used to create, what we call a “laydown” for one or many cameras from one or more sites (Figures 16, 17, 18 and 19).
Thanks to Chris Veness for providing the haversine functions and the basic layout for the page. The input fields arranged in the order that they appear in a CAL file.
While not part of AutoCAMS, it has proven to be a useful tool by many CAMS users.
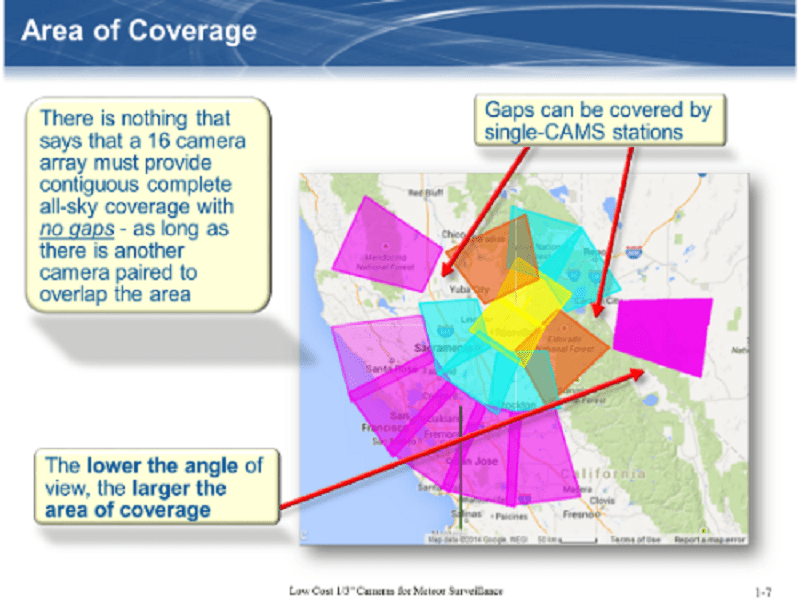
Figure 16 – An alternative Laydown can be more flexible.
Figure 17 – This image shows a Laydown of one of two 16 camera stations. When designed for each other, can achieve full-sky coverage.
Figure 18 – Laydown of the overlap between Sunnyvale and Jim Wray’s station in Forest Hill after Jim tilted his box toward Sunnyvale. Gray is Sunnyvale.
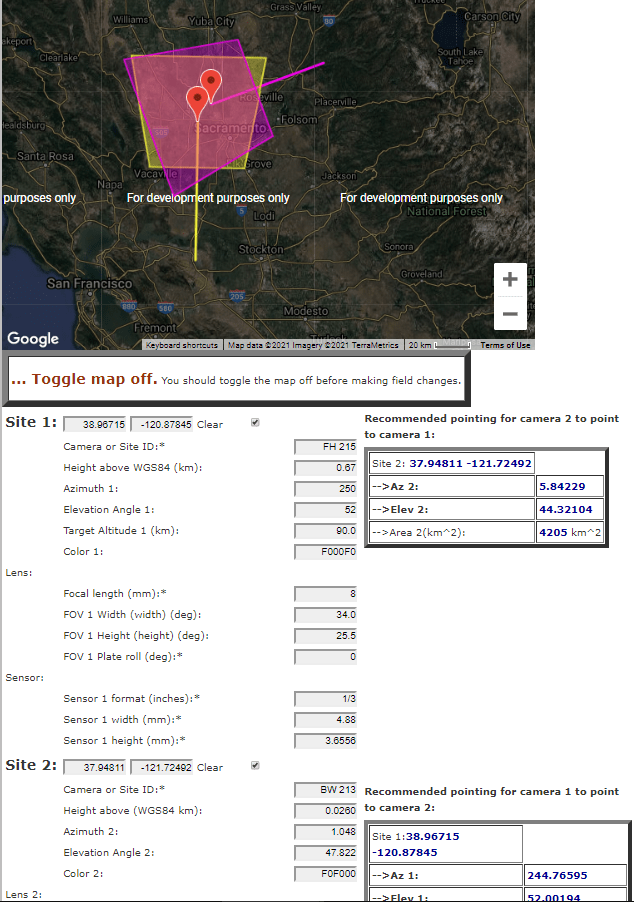
Figure 19 – CAMS Pointing Tool web page. Used for creating “laydowns” and figuring overlap with other cameras.
References
Samuels D., Wray J., Gural P.S., Jenniskens P. (2015). “Performance of new low-cost 1/3″ security cameras for meteor surveillance”. In, Rault J.-L. and Roggemans P., editors, Proceedings of the International Meteor Conference, Giron, France, 18-21 September 2014. IMO, pages 66–73.